
Using Unity 2019.2.1f1, LWRP 6.9.1 and Shader Graph 6.9.1. You can get the article’s code and shaders here.
I saw the tweet by Cyanilux and found out that Shader Graph’s Custom Node now supports arrays. So I decided to finish my Shield shader, for which I wrote a double-sided mesh generator previously. Also, Cyanilux already posted his shader breakdown.
As the mesh for the shield, I use double-sided mesh generated from Unity’s built-in sphere. I described the Depth intersection part of the shader graph in this article.
Simple shield

This graph uses Maximum Node to combine Depth intersection with Fresnel effect Node. The result is the third image below.

To make the shield look like the fourth image, you need to add texture. (I’ve done hex grid pattern texture in Gimp using this tutorial.)
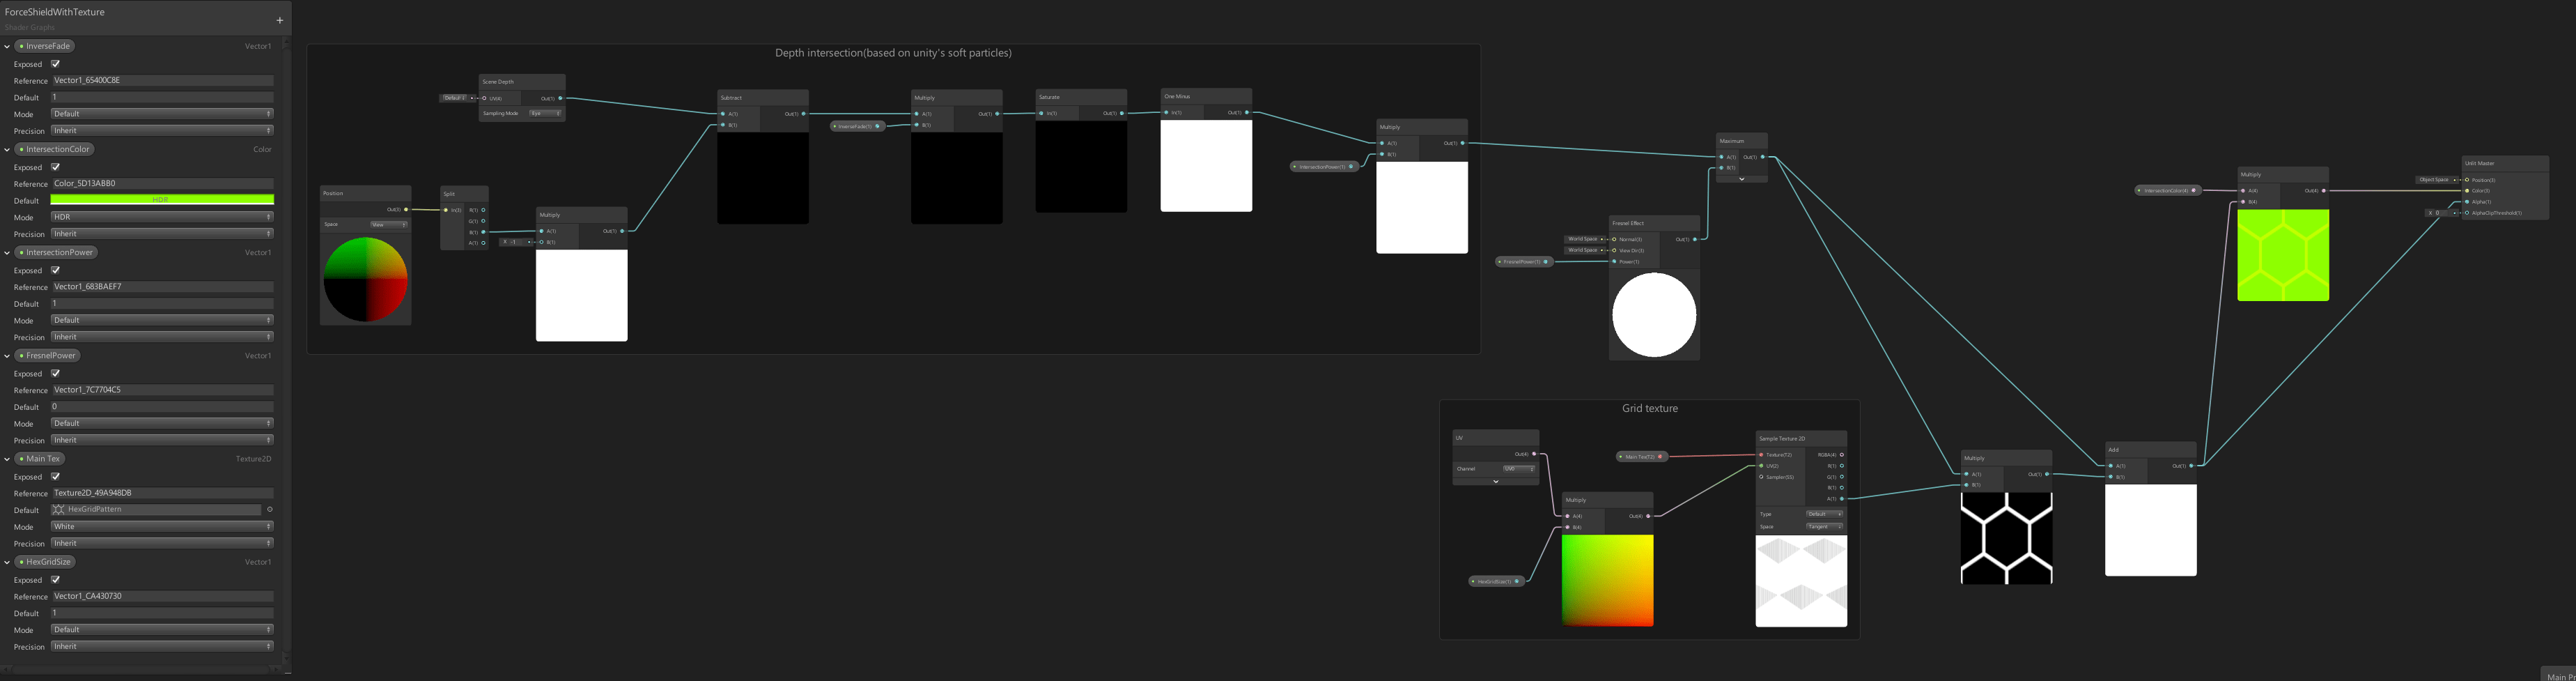
Multiply the sampled texture with the maximum node’s output to draw the texture only where Fresnel Effect or Depth intersection have effect.
Also, to combine texture with Fresnel Effect and Depth intersection effect, add the multiplication’s output and the maximum node’s output.
Hits
The following graph supports hits using Custom Function Node. It draws expanding rings from hit positions. Properties of the graph didn’t change because all info about hits is declared in the custom node.

The code of the custom node takes data provided by ForceShieldController script, then iterates over hits, and calculates the distance from the current drawn fragment to a hit position and using DrawRing draws a ring.
Arrays dimensions is set to 10(MAX_HITS_COUNT in ForceShieldController) because arrays in unity’s shaders are not dynamic.
#ifndef FORCE_SHIELD_BULLET_HITS
#define FORCE_SHIELD_BULLET_HITS

int _HitsCount = 0;
float _HitsRadius[10];
float3 _HitsObjectPosition[10];
float _HitsIntensity[10];

float DrawRing(float intensity, float radius, float dist)
{
    float border = 0.05;
    float currentRadius = lerp(0, radius, 1 - intensity);//expand radius over time
    return intensity * (1 - smoothstep(currentRadius, currentRadius + border, dist) - (1 - smoothstep(currentRadius - border, currentRadius, dist)));
}

void CalculateHitsFactor_float(float3 objectPosition, out float factor)
{
    factor = 0;
    for (int i = 0; i < _HitsCount; i++)
    {
        float distanceToHit = distance(objectPosition, _HitsObjectPosition[i]);
        factor += DrawRing(_HitsIntensity[i], _HitsRadius[i], distanceToHit);
    }
    factor = saturate(factor);
}
#endif
DrawRing draws circle (1 – smoothstep(currentRadius, currentRadius + border, dist)) and then removes (substructs) smaller circle from it (1 – smoothstep (currentRadius – border, currentRadius, dist)). The result is a ring with radius equal to currentRadius and thickness of border * 2.
In the following shader graph, you can see how this looks in preview windows.

ForceShieldController stores all hit updates for their lifetime and provides data to the renderer using MaterialPropertyBlock. Hits are stored in object space, and in the custom function distance calculated in object space. Because the calculation is in objects space you don’t need to transform hits positions if, for example, your shield moves or rotates.
    public class ForceShieldController : MonoBehaviour
    {
        [SerializeField, Range(0, 1)]
        float _DissolveValue;

        const int MAX_HITS_COUNT = 10;

        Renderer _renderer;
        MaterialPropertyBlock _mpb;

        int _hitsCount;
        Vector4[] _hitsObjectPosition = new Vector4[MAX_HITS_COUNT];
        float[] _hitsDuration = new float[MAX_HITS_COUNT];
        float[] _hitsTimer = new float[MAX_HITS_COUNT];
        float[] _hitRadius = new float[MAX_HITS_COUNT];

        //1(max)..0(end of life time)
        float[] _hitsIntensity = new float[MAX_HITS_COUNT];


        public void AddHit(Vector3 worldPosition, float duration, float radius)
        {
            int id = GetFreeHitId();
            _hitsObjectPosition[id] = transform.InverseTransformPoint(worldPosition);
            _hitsDuration[id] = duration;
            _hitRadius[id] = radius;

            _hitsTimer[id] = 0;
        }
        int GetFreeHitId()
        {
            if (_hitsCount < MAX_HITS_COUNT)
            {
                _hitsCount++;
                return _hitsCount - 1;
            }
            else
            {
                float minDuration = float.MaxValue;
                int minId = 0;
                for (int i = 0; i < MAX_HITS_COUNT; i++)
                {
                    if (_hitsDuration[i] < minDuration)
                    {
                        minDuration = _hitsDuration[i];
                        minId = i;
                    }
                }
                return minId;
            }
        }

        public void ClearAllHits()
        {
            _hitsCount = 0;
            SendHitsToRenderer();
        }


        void Awake()
        {
            _renderer = GetComponent<Renderer>();
            _mpb = new MaterialPropertyBlock();
        }

        void Update()
        {
            UpdateHitsLifeTime();
            SendHitsToRenderer();
        }
        void UpdateHitsLifeTime()
        {
            for (int i = 0; i < _hitsCount;)
            {
                _hitsTimer[i] += Time.deltaTime;
                if (_hitsTimer[i] > _hitsDuration[i])
                {
                    SwapWithLast(i);
                }
                else
                {
                    i++;
                }
            }
        }
        void SwapWithLast(int id)
        {
            int idLast = _hitsCount - 1;
            if (id != idLast)
            {
                _hitsObjectPosition[id] = _hitsObjectPosition[idLast];
                _hitsDuration[id] = _hitsDuration[idLast];
                _hitsTimer[id] = _hitsTimer[idLast];
                _hitRadius[id] = _hitRadius[idLast];
            }
            _hitsCount--;
        }


        void SendHitsToRenderer()
        {
            _renderer.GetPropertyBlock(_mpb);

            _mpb.SetFloat("_DissolveValue", _DissolveValue);
            _mpb.SetFloat("_HitsCount", _hitsCount);
            _mpb.SetFloatArray("_HitsRadius", _hitRadius);

            for (int i = 0; i < _hitsCount; i++)
            {
                if (_hitsDuration[i] > 0f)
                {
                    _hitsIntensity[i] = 1 - Mathf.Clamp01(_hitsTimer[i] / _hitsDuration[i]);
                }
            }

            _mpb.SetVectorArray("_HitsObjectPosition", _hitsObjectPosition);
            _mpb.SetFloatArray("_HitsIntensity", _hitsIntensity);
            _renderer.SetPropertyBlock(_mpb);
        }
    }
Appearing/Disappearing
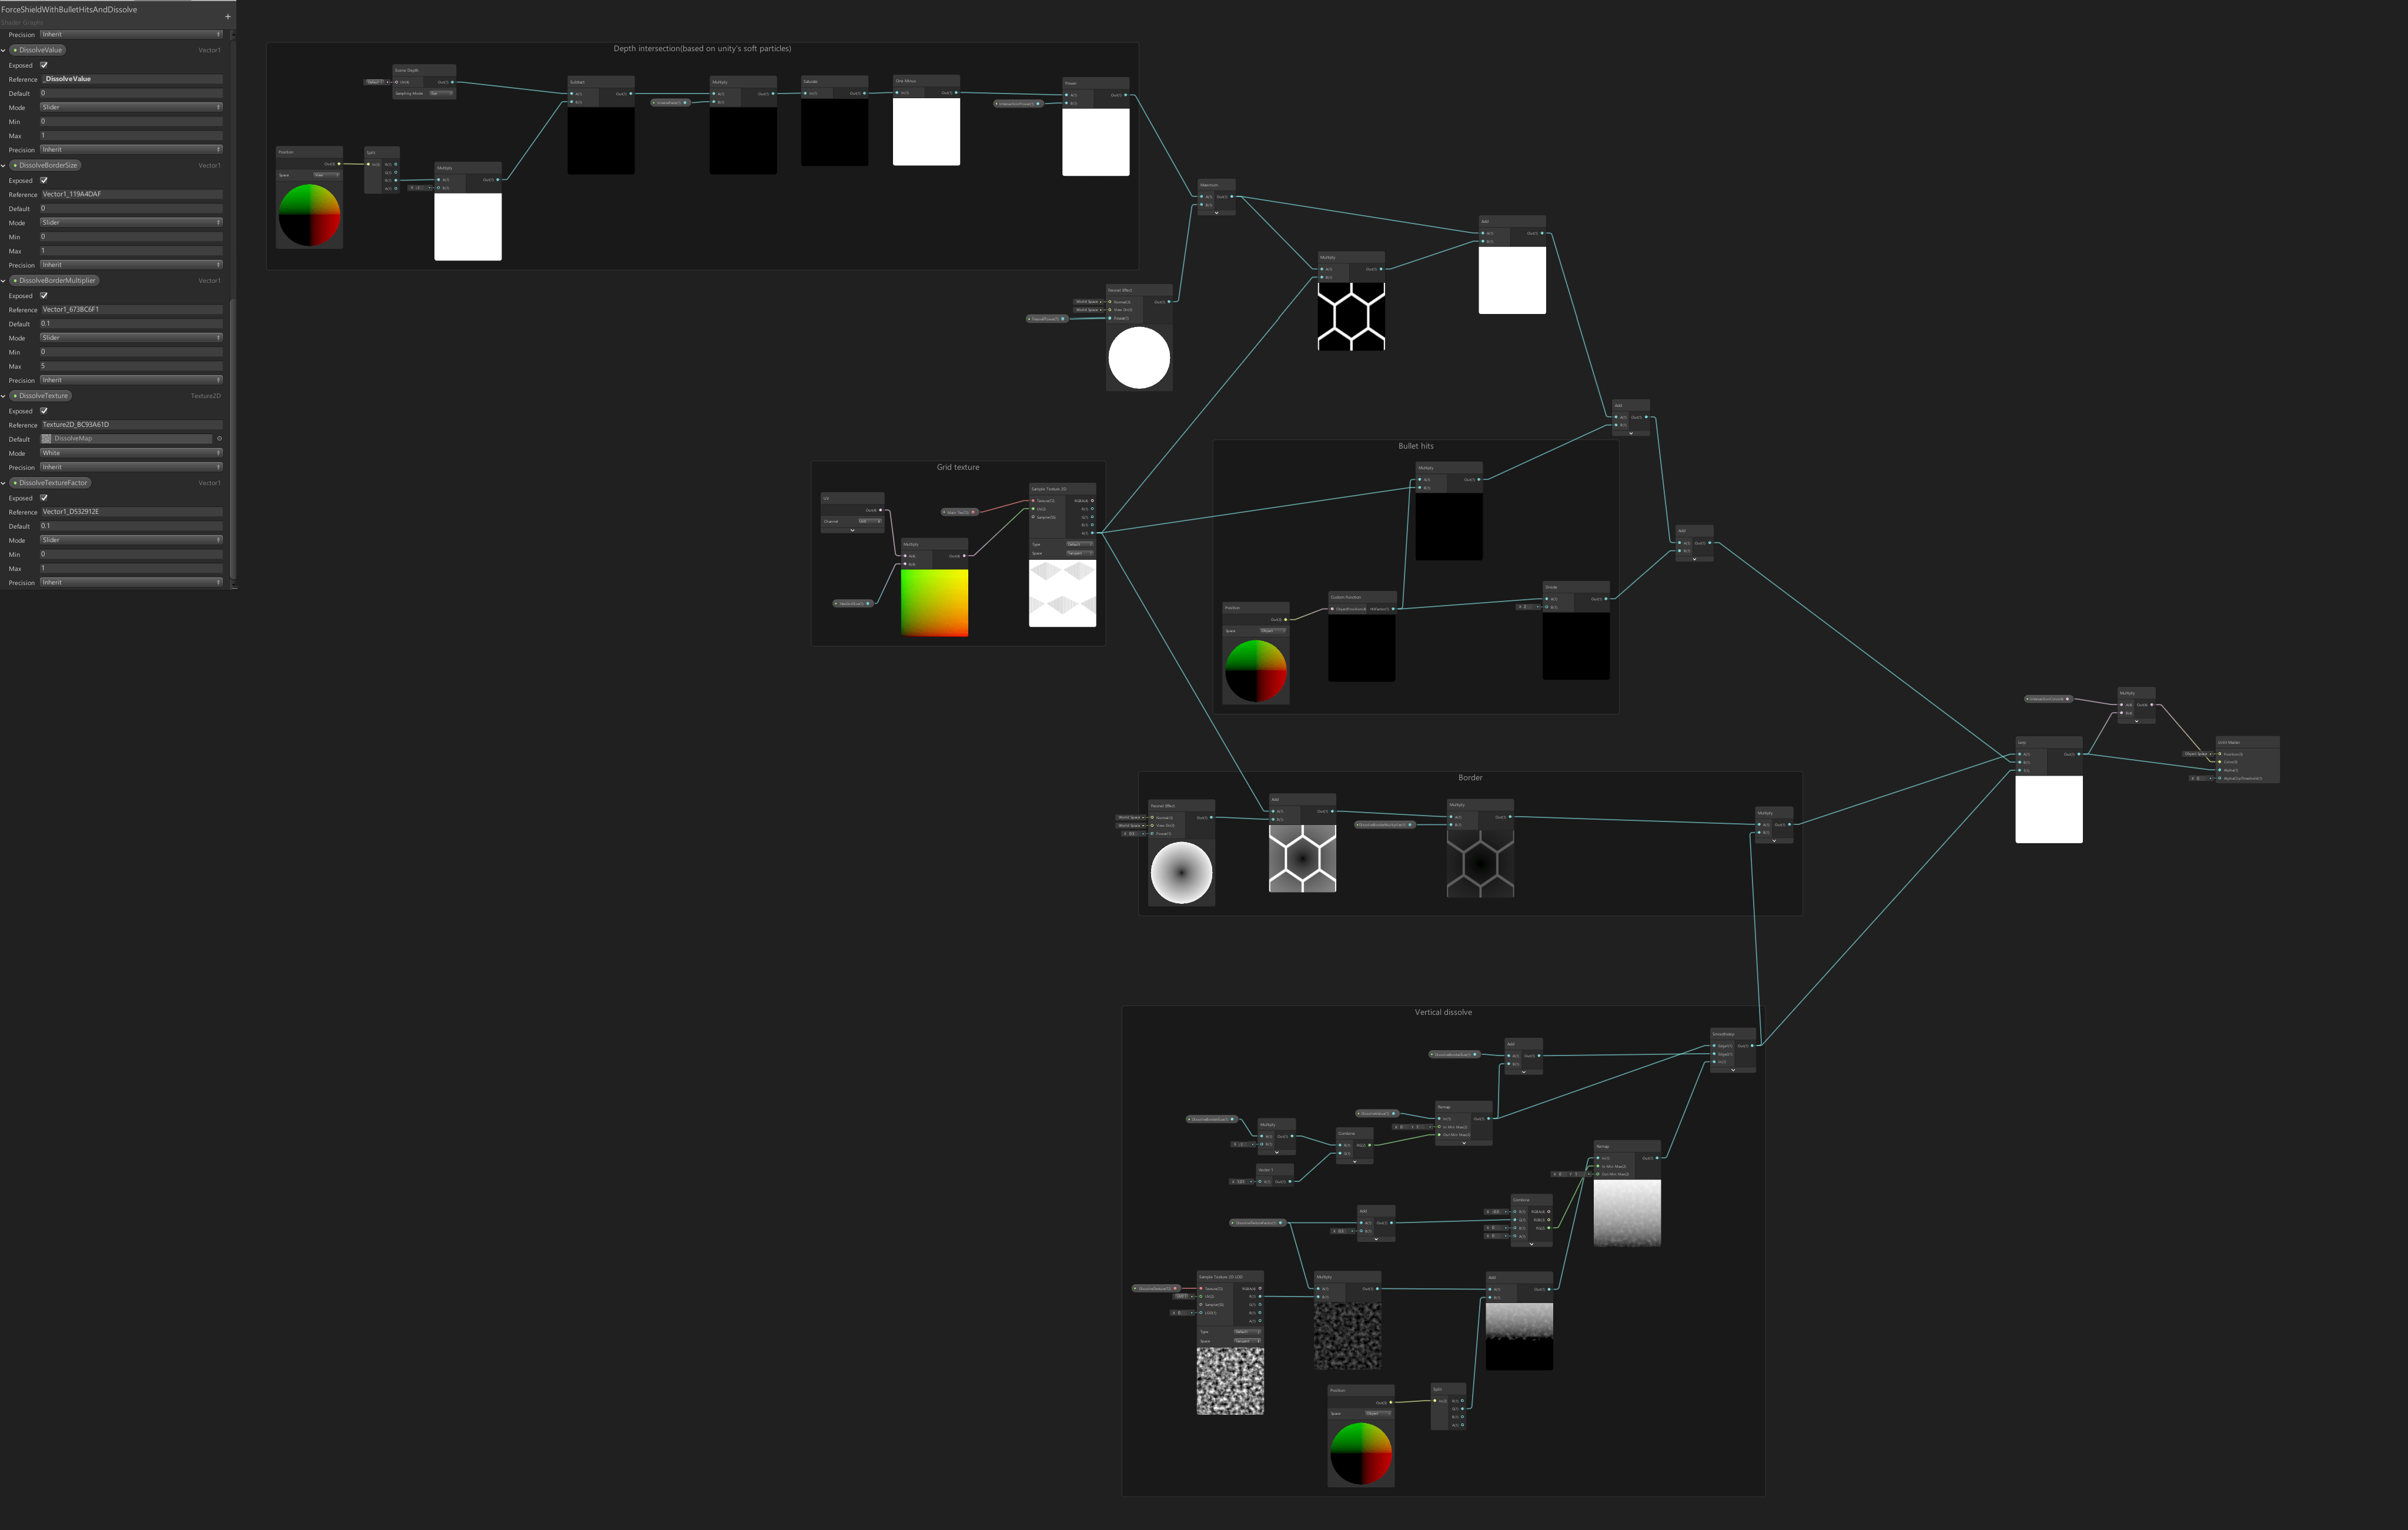
To make the shield dissolve from top to bottom, you need to know the size of your model in object space (I use sphere with the radius of 1 meter and pivot in the origin, so along the Y-axis all vertices of the sphere are between -0.5 and 0.5 meters.)
Top-down dissolve uses Smoothstep Node and, like in the Dissolve article, Edge1 is DissolveValue, Edge2 is DissolveValue + BorderSize. But in In input, there isn’t dissolve texture, but object space position Y.
On the picture below the force shield colour is green, the border colour is red. On the left Smoothstep Node has object space position.Y as In input.
On the right, the uneven border is achieved by adding to object space position Y the sampled value from DissolveTexture. And DissolveTexture’s value is multiplied by DissolveTextureFactor to control the contribution of texture.

You can get the article’s code and shaders here.
hi
thank’s for your greate post
i can’t find this custom function
The link does not open
Hi. It seems the old link leads to Unity’s GitHub repository that Unity closed.
https://docs.unity3d.com/Packages/com.unity.shadergraph@11.0/manual/Custom-Function-Node.html
hi
great job thank you
Hi! Thank you so much for your work. This custom function and a script was the missing link on my force field shader. Also taught me something new.
You and Cyanilux are legends!
Thank you!:)